Creating a New Case Card on InsiteOR
Overview
With InsiteOR you can create Case Cards to represent procedures your patients are having performed by your physicians at various centers and hospitals. Case Cards contain sections to record the Equipment, Medications, Supplies, and Devices used, as well as record implant serial numbers and other important information. Case Cards are created with all of the preference card information loaded upon creation, and automatically notify anyone added to the associated staff via Text, Email, or push notification (app/website)
How to create a new Case Card on InsiteOR
Below are the steps to take to create a new Case on InsiteOR. The creation of this Case will automatically notify your vendors, their reps, and other members of your team about the new medical procedure that is associated with the attached preference card (SmartCard).
Once the case is created, you can fax, upload, update, and add information to the Case Card. You can also use this Case Card to centralize notes, procedure information, lab & specialist authorizations, approvals, and much more. Additionally, the Case Card allows you to message any user associated with the case, and upload documentation or imaging for the rep to review, instantly.
Logging In to your Office
Log in to InsiteOR using your username and password
From your profile, click on the Office that the procedure is being scheduled from, from your profile overview section.
Viewing the Office Case Cards
Within the Office Menu, click on the “Case Cards” Section of the Office Menu
Click on the “New Case Card” button in the top right corner to create a new Case Card.
You can also create a new Case Card from a Fax in your Fax Management Menu. See our FAQ here on how to do this!

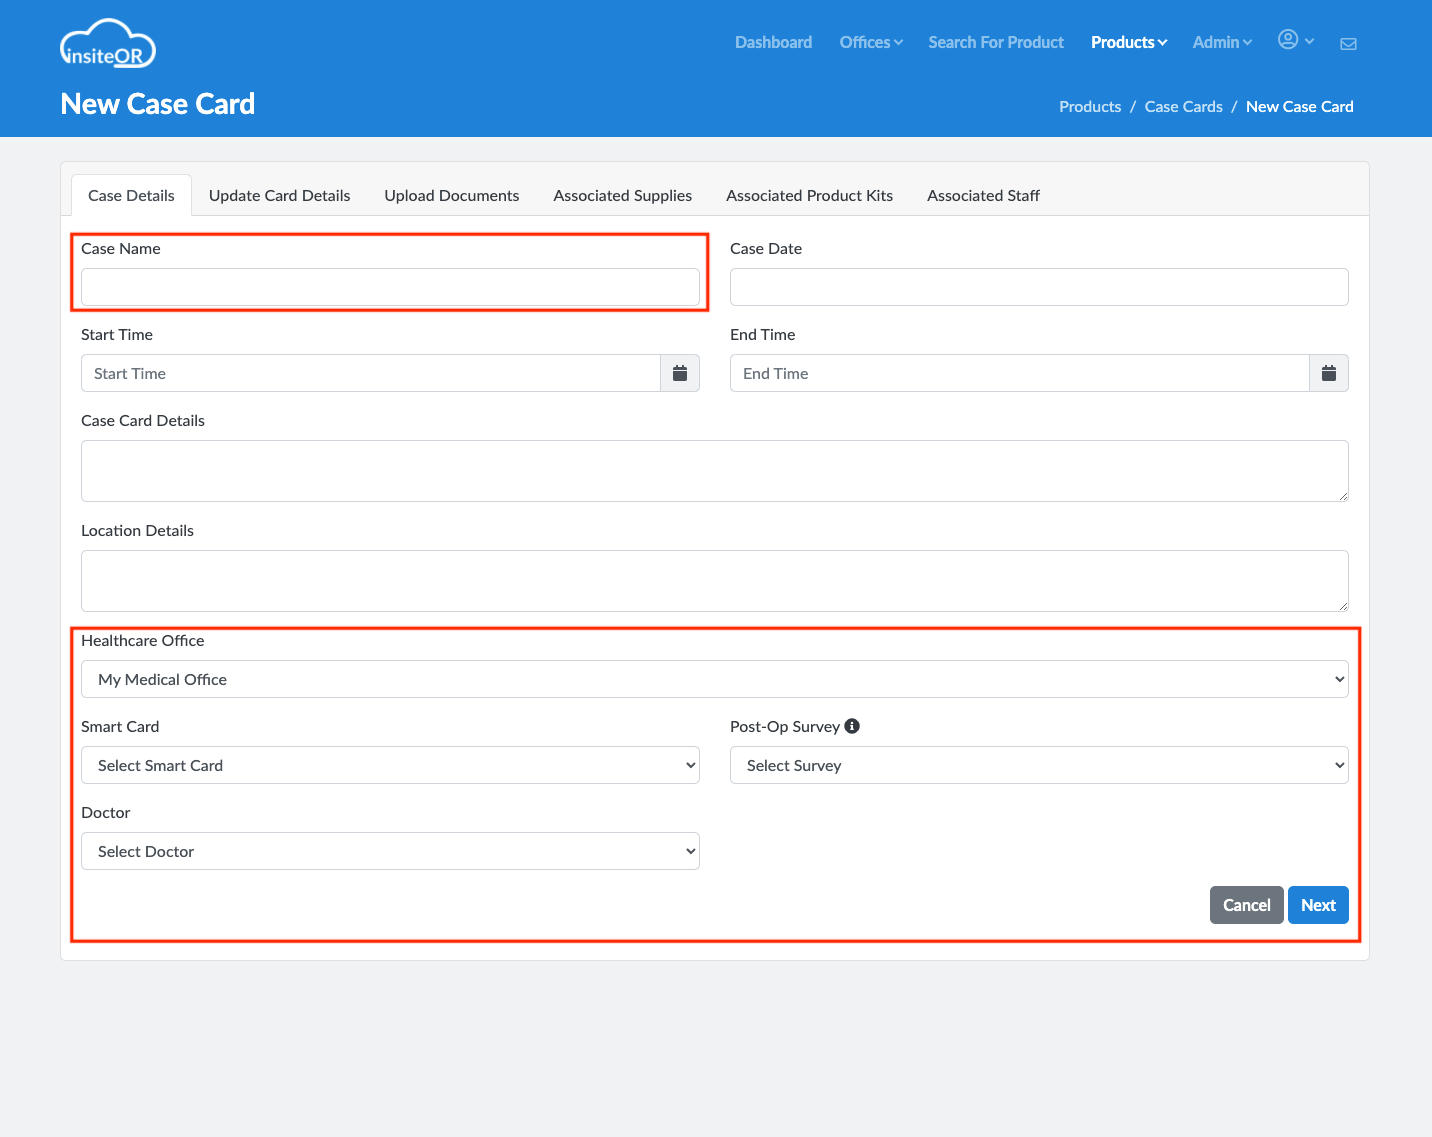
Case Details Section
When you click to create a new case, you will be brought to the Case Details tab of a new Case Card.
The Case Name should be something you can easily search for like “J Smith #123456 ABC Surgery”
Select the Medical Office you are booking this surgery from. This is usually your office unless you manage multiple locations and schedule on behalf of all.
Once you select an office, the Physicians associated with that office will appear along with their Preference Cards for the Surgery Order
Lastly, you can attach a Post-Operative survey that is fully customizable to fit your needs.
Click Next to save your entry and move on to the next section
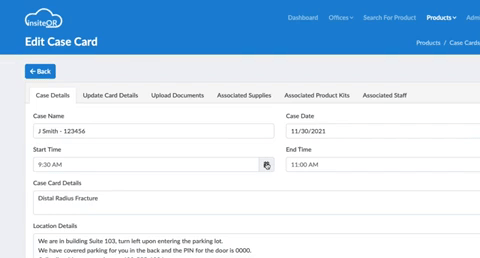
Update Preference Card Details
The next tab, “Update Card Details”, will show you all of the information that has been preloaded based on the Preference Card chosen on the previous screen.
Smart Cards are InsiteOR’s Preference Cards, which contain all of the procedures notes, supplies, equipment, and instruments that the physician will need to perform surgery. It also saves any staff or reps who need to be made aware.
Click Next to save your entry and move on to the next section

Upload Documents
The next tab allows you to upload supporting documentation that needs to be shared with others on the case.
This could be anything from imaging, labs, authorizations, or other documents you already had prepared to items other offices email or fax to you.
You can also always add the Fax to the Case Card using the “Attach Fax to Case” workflow.
Click Next to save your entry and move on to the next section

Associated Product Kits and Supplies
The Associated Supplies and Product Kits are used by the associated Medical Reps.
You can skip these tabs as the associated rep will be notified to confirm the attached supplies and kits are correct.
Finally, you can add or remove users s needed to the case.
Every added user will begin receiving notifications when the case information is updated. You can also add your billing, coding, and insurance users to your office and include them in your case. This would automatically notify them of a new case to verify a patient’s group and member ID # for.
Click Next to save your entry and move on to the next section
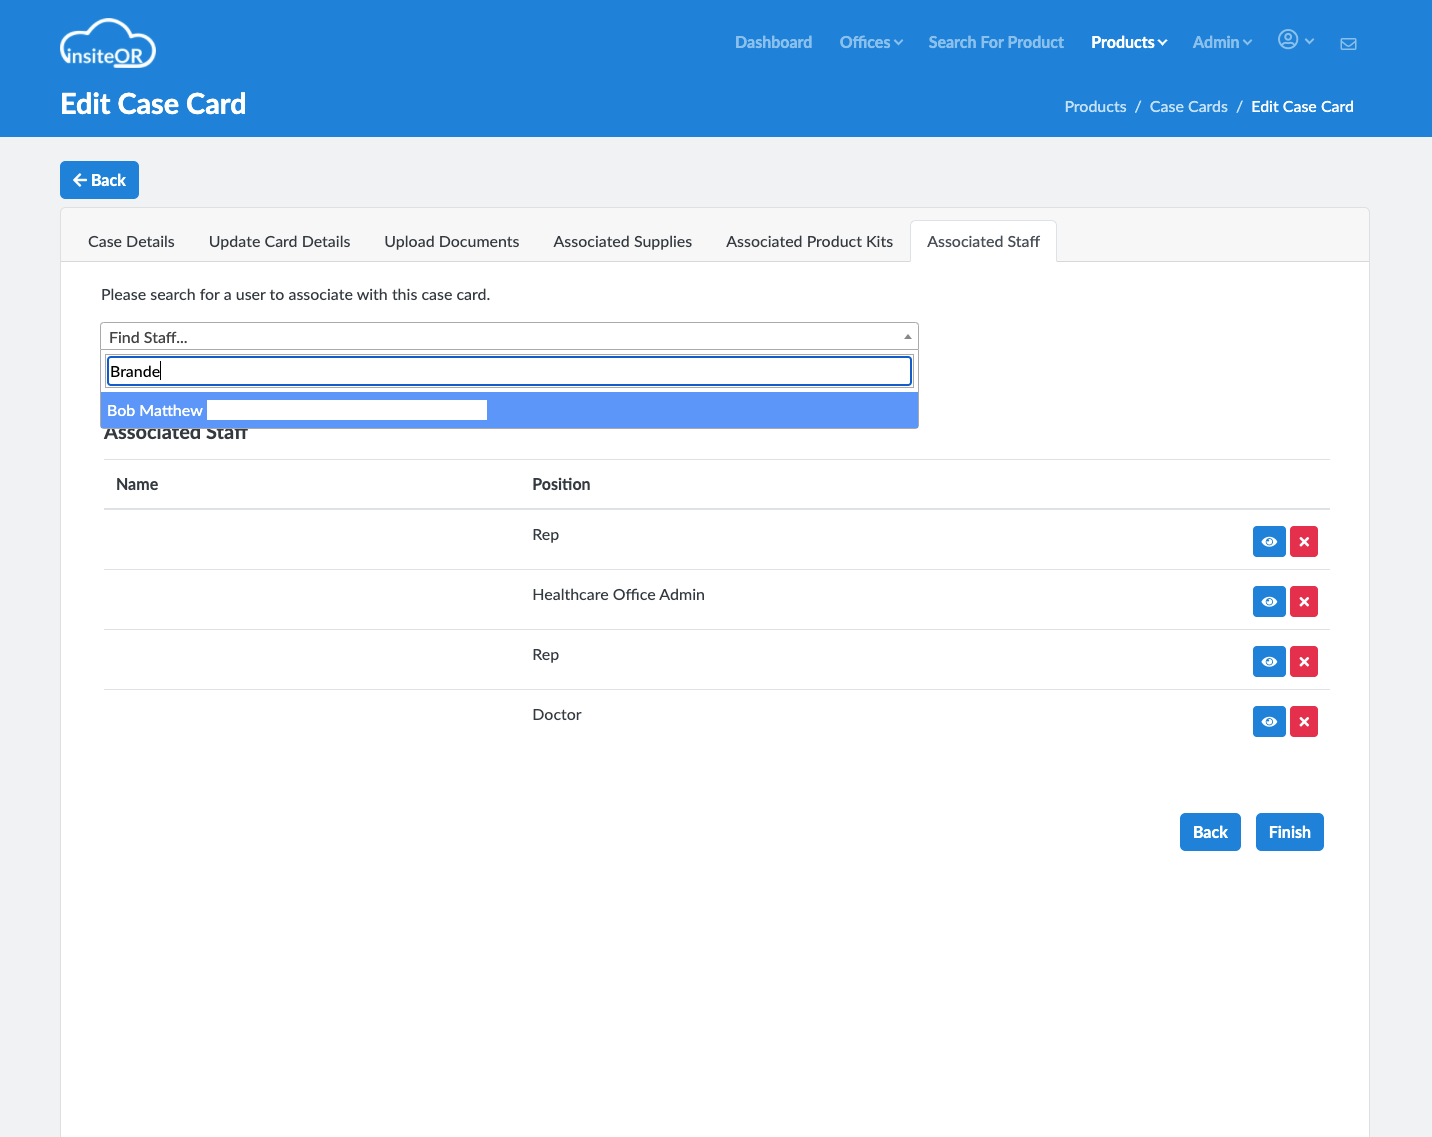
Associated Office Staff
Once you have added all of the users you want to associate, click “Finish” to create the Case Card.
Click Finish to save your entry and save your Case Card.
Were you able to complete this process?
If not, please submit a ticket here or email us at help@insiteor.com
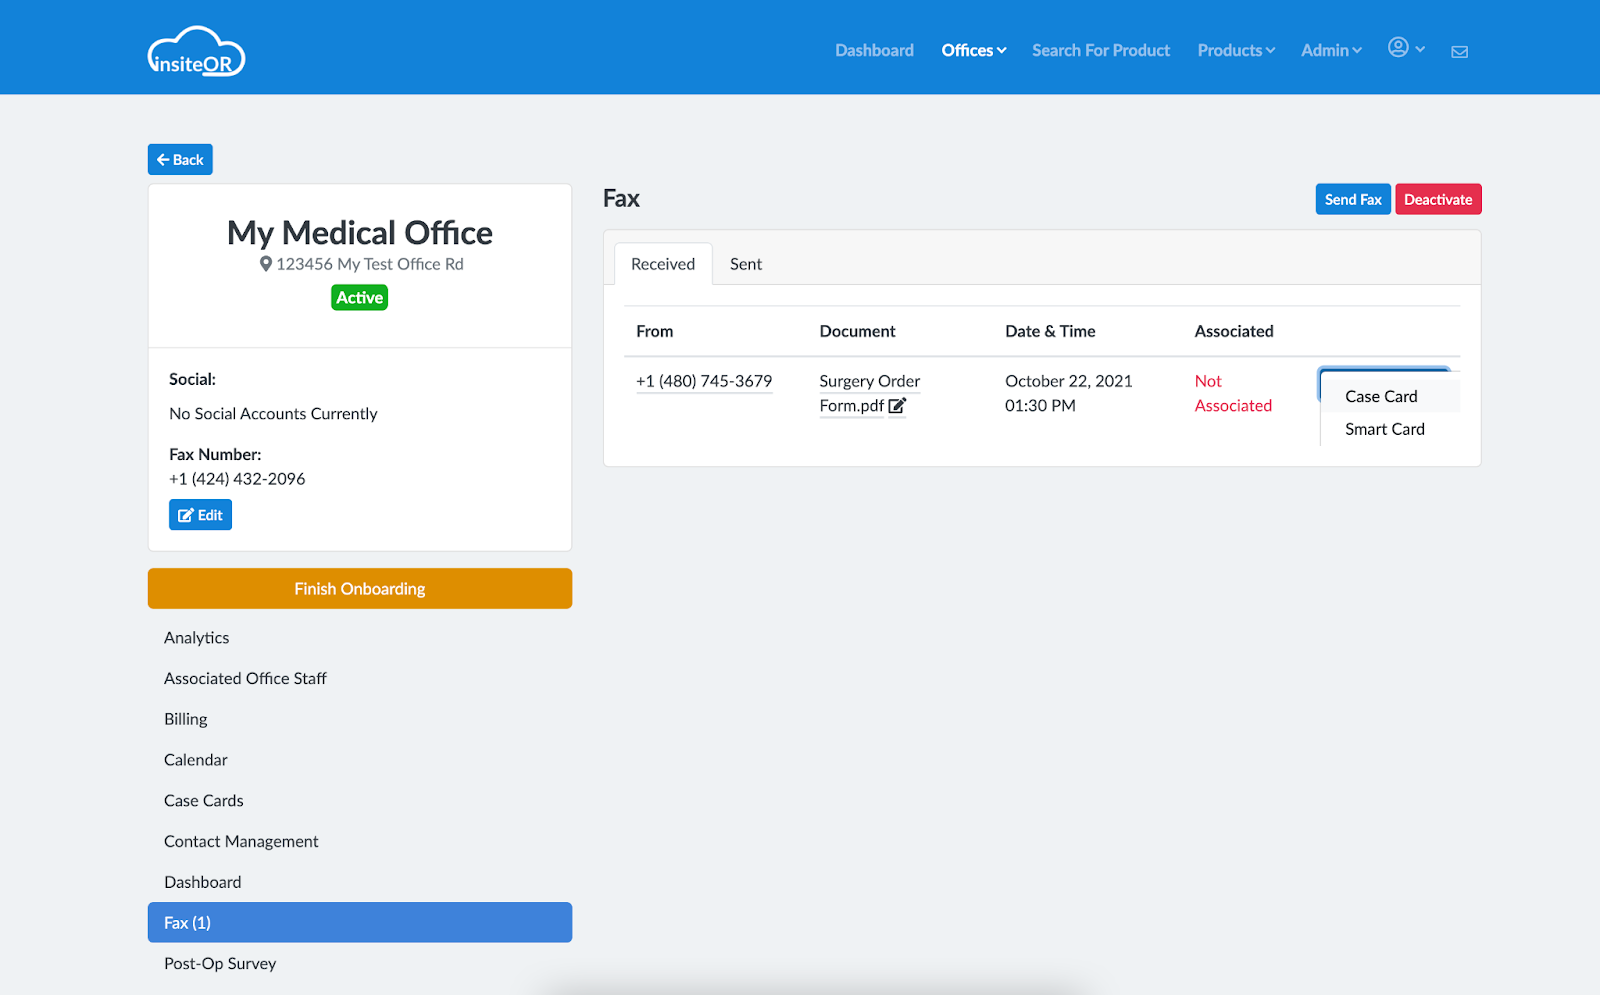
Creating a new Case Card with or without Fax InsiteOR provides you with the ability to send and receive Faxes from your own Digital Office! This document outlines how to get started with Fax on InsiteOR and how you can use it to simplify your scheduling workflows. Anytime a Fax is sent or received from your InsiteOR number, the platform will notify you and turn the Fax into a pdf file. From here you can attach this Fax directly to a procedure on InsiteOR, or share it with other systems you use. Once you have sent a Fax to InsiteOR, you can create a new procedure from this Fax or attach it to procedures that already exist on InsiteOR. With InsiteOR Fax, you can easily receive, organize and share information for any case that you have or plan to schedule. With all of the information in one spot from start to finish, you can spend less time on the phone and automatically notify everyone involved as updates are made. The steps below outline how to find your InsiteOR Fax number, send a Fax to this number and then attach or schedule a Case on InsiteOR from this Fax. Let’s get started! Start by preparing the Documents you want to Fax to InsiteOR. Paper documents that you need to fax to InsiteOR can be filled out documents, blank forms for other people to fill out, or just information to save associated with the procedure. You can fax additional documents and add them to your cases at any time in the future as well. Next, Log in to InsiteOR using your username and password and click “submit” If you forgot your password, you can click you forgot password and a link will be sent to you to reset your login information. Once signed in, click on “Offices” from the menu bar and select the name of the Office that you would like to open. The Portal for that Office will open and your Fax number will be listed underneath “Fax Number” From the Portal Menu on the left-hand side, click on the “Fax” Section Once the message is sent, you will find the newly received Fax in the “Received” Tab as a newly received Fax. There is also a “Sent” tab that shows Fax Messages you sent from InsiteOR You can type to search or filter as necessary, but the new fax will likely be the first entry. Once you find the sent Fax, click on the blue “Associate With” Button to link the Fax to a Scheduled Surgery or Create a New Surgery Faxes will be marked as ”Not Associated” and have a blue button saying “Associate With” Faxes already associated with a Scheduled Surgery/Case Card will be tagged with the Case they are associated with. You can remove this association as necessary by clicking “Remove Association” When you click to Associate the Fax with a Case Card, you will be asked to select a Case Card from that office to associate the Fax with. This would be for adding newly faxed documents regarding a patient’s authorization or other information to an already existing Case Card. You can even share your InsiteOR Fax number with others so they can Fax information directly to you on InsiteOR. Once you select a Case Card from the drop-down menu, select “Associate” and you will be brought back to the office. The Fax will now list the Case that you associated it with This will automatically notify users in that case that a new Fax has been added When you click to Associate the Fax with a “Smart Card”, you will be asked to choose which “Smart Card” you want to use. These Smart Cards allow you to templatize the Surgery Order forms per procedure. Once you select the name of the procedure being ordered, the creation of a new Case Card using the preferences stored from that Smart Card will be started. Once you have submitted the Case Card, a notification will automatically be sent to users on that case, alerting them that a new Fax has been added to a newly made Case Card.Overview
How to create a new Surgery on InsiteOR from a Fax on InsiteOR
Finding your Fax Number
Fax Management
Sending and attaching a Fax to a scheduled procedure

Scheduling a new procedure from a Fax
Were you able to complete this process?
If not, please submit a ticket here or email us at help@insiteor.com


Case Cards represent a procedure that has been scheduled or performed. They will contain all of the pertinent information Medical Reps need to stay in touch while remaining secure and HIPPA compliant.
You can view cases by going to the Case Card menu, the Office Calendar, and Office Case View, giving you tons of ways to stay up to date and coordinate with your teams about upcoming appointments, adjustments, and other unforeseen scheduling challenges.
Go to the top menu bar and click “Products” and click “Case Cards”
From the list of cases, click the “eye” icon of a Case
Once you click to view the case card, you will be brought to the card’s main screen.
Were you able to complete this step? If not, please submit a ticket here or email us at help@insiteor.com
The Case Card organizes what is being used, who is involved, the plan vs. the results, the Case Teams post-op feedback, and all communication related to that specific case in one spot.
Every Case Card has 5 Main components:
Associated Supplies
Associated Product Kits
Associated Staff
Reconciliation
Post-Op Survey
Communication
Fax
Each tab allows you to organize relevant information into categories that follow the natural flow of a surgical case process.
Clicking on a case card will bring you to the “Associated Supplies” tab.
From here you can click the “eye” icon to view a specific product in a new tab.
Allows you to search the products that are currently set to be pulled for the case.
You can also click into and view these products in more detail and view any attachments the product entry has such as sizing guides and other information
Were you able to complete this step? If not, please submit a ticket here or email us at help@insiteor.com

Close the tab you opened from viewing the product, & click on the “Associated Staff”
This tab allows you to view the users on InsiteOR that are associated with this case.
You can easily click into their profile and message them privately, or obtain their contact information
Were you able to complete this step? If not, please submit a ticket here or email us at help@insiteor.com

Click to view any of the staff and you will be taken to their profile in a new tab.
From here, you can click on “Message” and send them a test message
Send a Test message by clicking the “type message box” and typing a message.
Then click the paper airplane icon to “send”
Once you send a message, you can exit this tab that was opened and go back to the Case Card
Were you able to complete this step? If not, please submit a ticket here or email us at help@insiteor.com
Let’s say that the scheduler for the case needs to add a Product Kit for an upcoming distal radius, however, they just found out that they need a kit for 3 fracture points instead of the one they had originally thought was needed. This means more screws and plates than a single fracture kit. They have messaged YOU on InsiteOR and have asked you to share a product kit containing the right supplies with her.
In the Top Menu, click on “Products” and then click “Product Kits”
Click the eye “icon” of the product kit you would like to share with the Scheduler on the Case Card
Once the Product Kit screen loads, Copy the URL of the Product Kit
The URL should look something like this insiteor.com/product_kits/44/products
Go back to the Case Card by clicking on “Offices” and clicking on the office from the drop-down In the top menu
Were you able to complete this step? If not, please submit a ticket here or email us at help@insiteor.com
Click on the menu section “Calendar”
Select the case from the Calendar view and click on the Communications tab under “More”
Paste the URL into the text box and click the Paper Airplane Icon to send
You should see the URL turn into the Name of the product kit and it should be a clickable link that the team on the case card can all now view
Were you able to complete this step? If not, please submit a ticket here or email us at help@insiteor.com
Case Cards Overview
What is a Case Card
Case Cards represent the various procedures and operations that a specific office has scheduled, had scheduled, and/or performed. Case Cards contain sections of information to cover every aspect of the procedure including the supplies used, the implants and devices, the surgical care team including vendors, and more.
How to View Case Cards
Case Cards can be viewed from the Office Page View via the Products>Case Cards Menu Option, or from your Profile under the “Associated Case Cards” Tab.
You can view any Case Card you are associated with, allowing you to always be aware of upcoming procedures as well as last-minute add-ons and adjustments.
Depending on the Office, the Case Card’s owner, and other factors, you may or may not be able to add or edit the information of the Case Card.
Viewing Case Cards From an Office
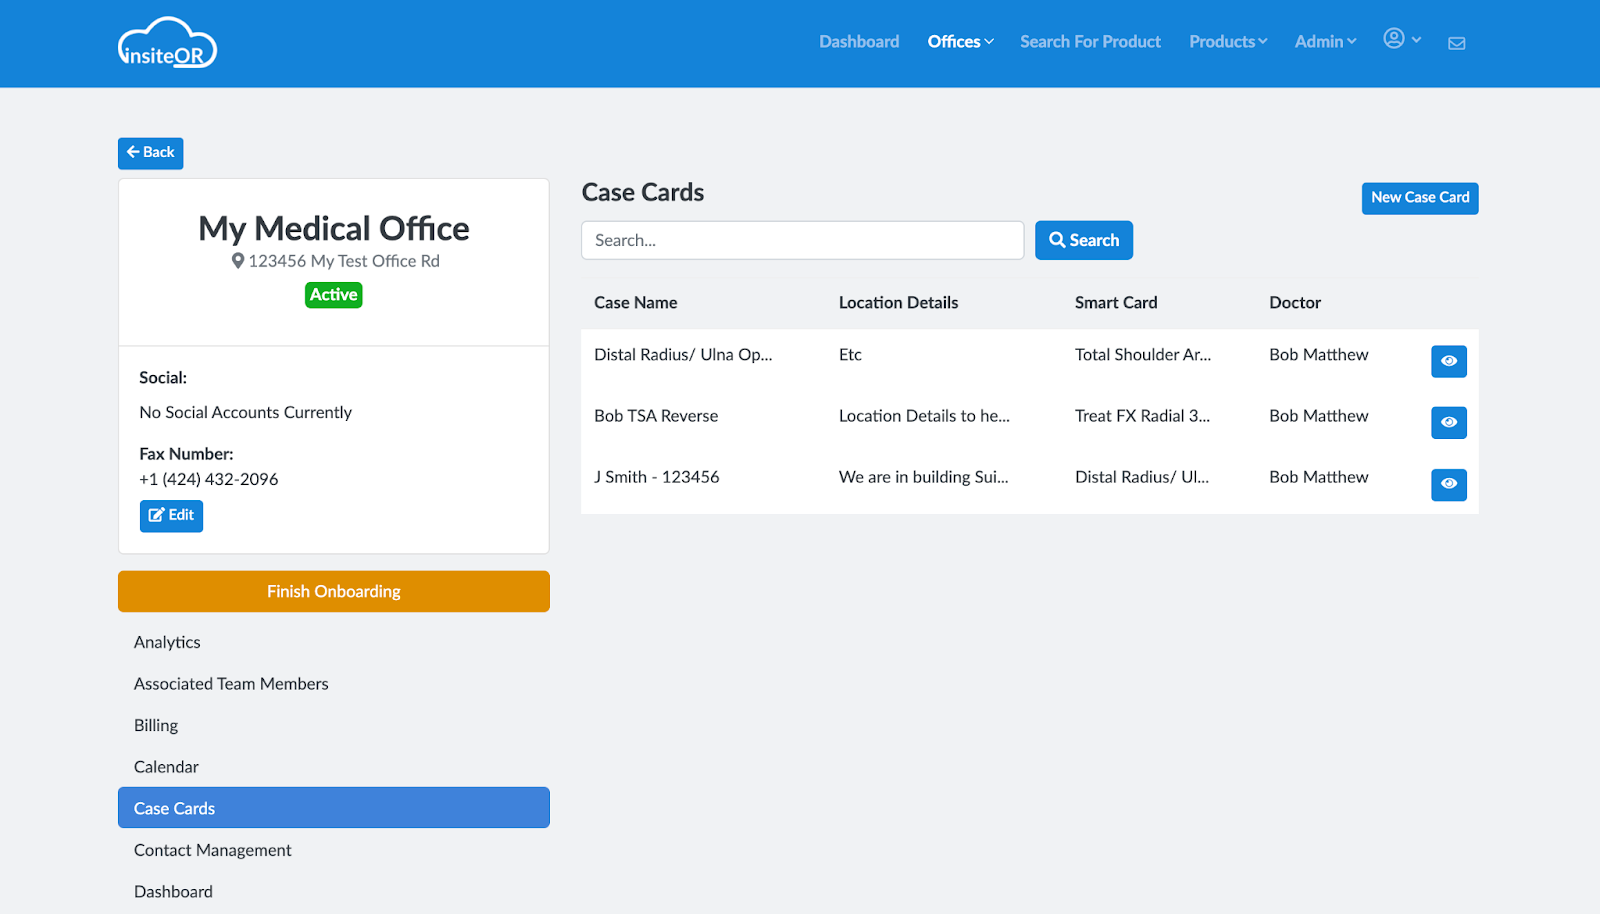
If you want to view Cases from the Office, click on the “Case Cards” tab to view all of the Case Cards for that Office
Case Cards represent a surgery procedure that has been scheduled or performed for a patient from your office. They would most likely correlate to one of the encounters recorded in your EHR/EMR or PMS system, or anywhere else you currently record these procedures.
To view a Case Card, click the “Eye” icon to open the Case Cards page.
Viewing Case Cards in a List
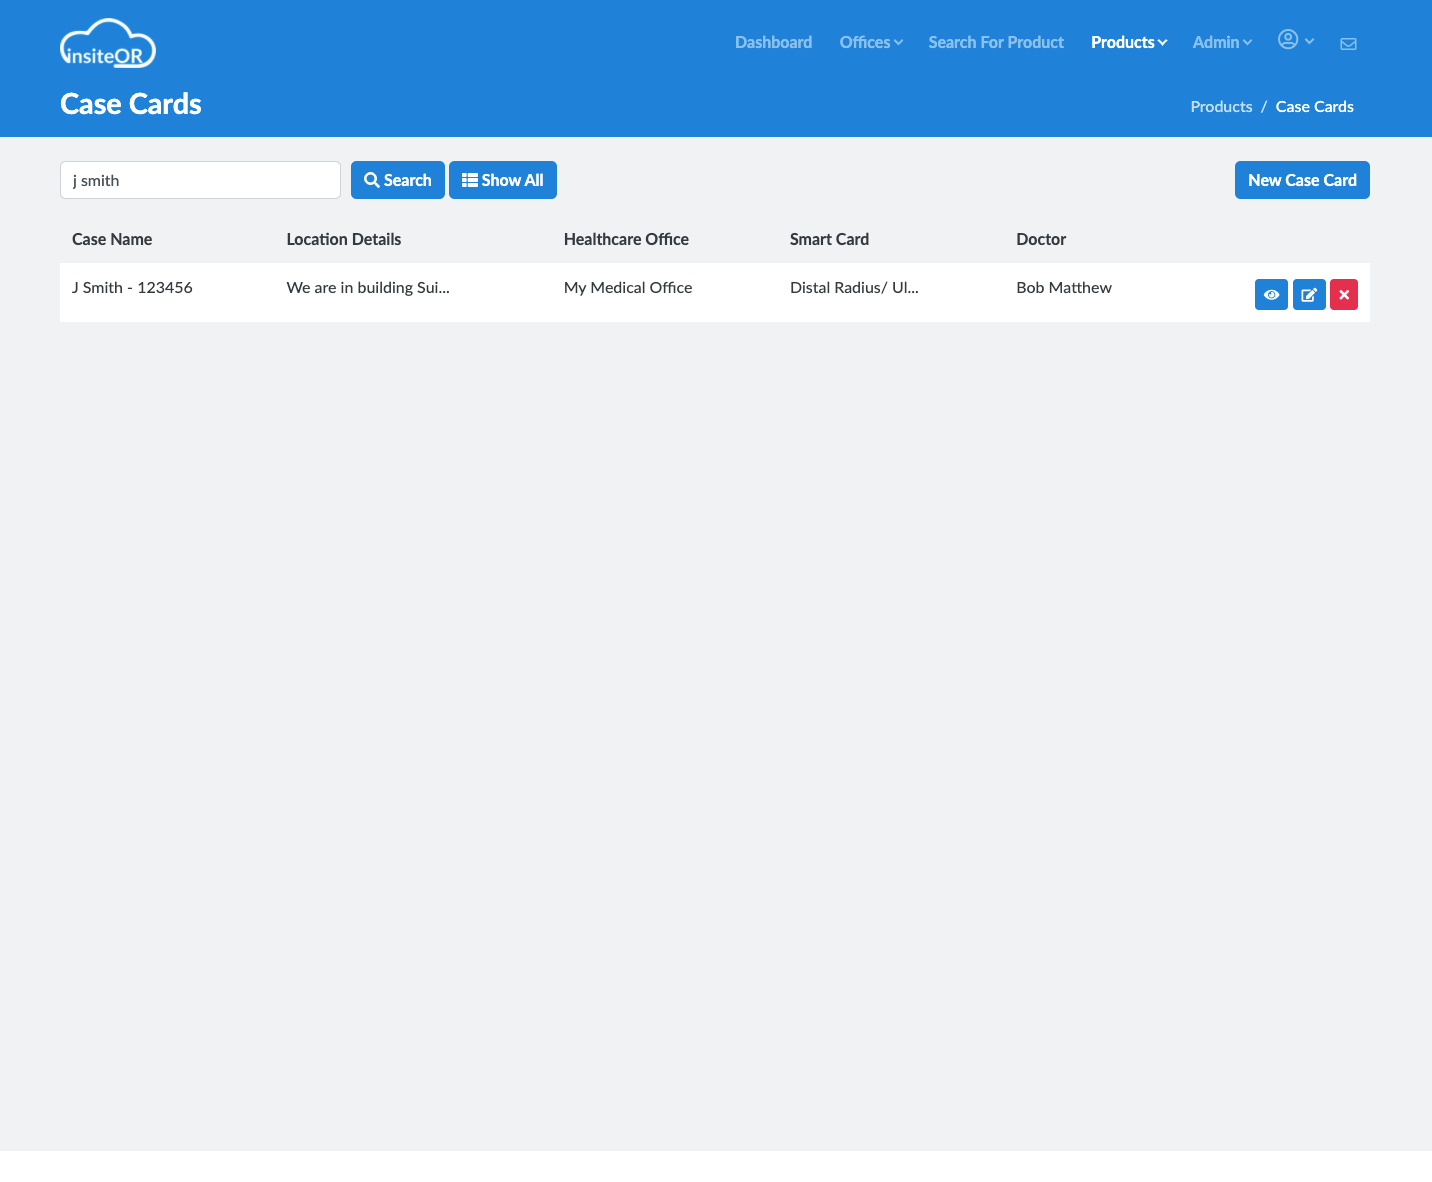
You can also view Case Cards in a list view by clicking on the Case Cards option from the top Menu Bar.
Find and click the “Products” option from the menu
From the drop-down menu, select “Case Cards”
This screen will show you all of the Case Cards your user profile is associated with regardless of the office you work at.
This is especially important if you work with multiple offices and providers, or provide equipment and devices to many offices in your area.
To view a Case Card, click the “Eye” icon to open the Case Cards page.
Case Cards contain all of the scheduling information, the supplies, and materials used, the surgical care team that will be present, and more in one place.
Case Cards allow you to organize all of the information that is sent in a surgery order or Office form in one spot digitally.
You can easily add new cases to your calendar with the click of a button using the “Add to Calendar” button (see below).
Opening a Case Card on InsiteOR
Every Case Card has a Name, the Case Card Details, the General and Categorized Notes Section, as well as the various Menu Tabs. The Case Card page layout below uses red, green, and blue boxes to show how this information is sectioned off on the page.
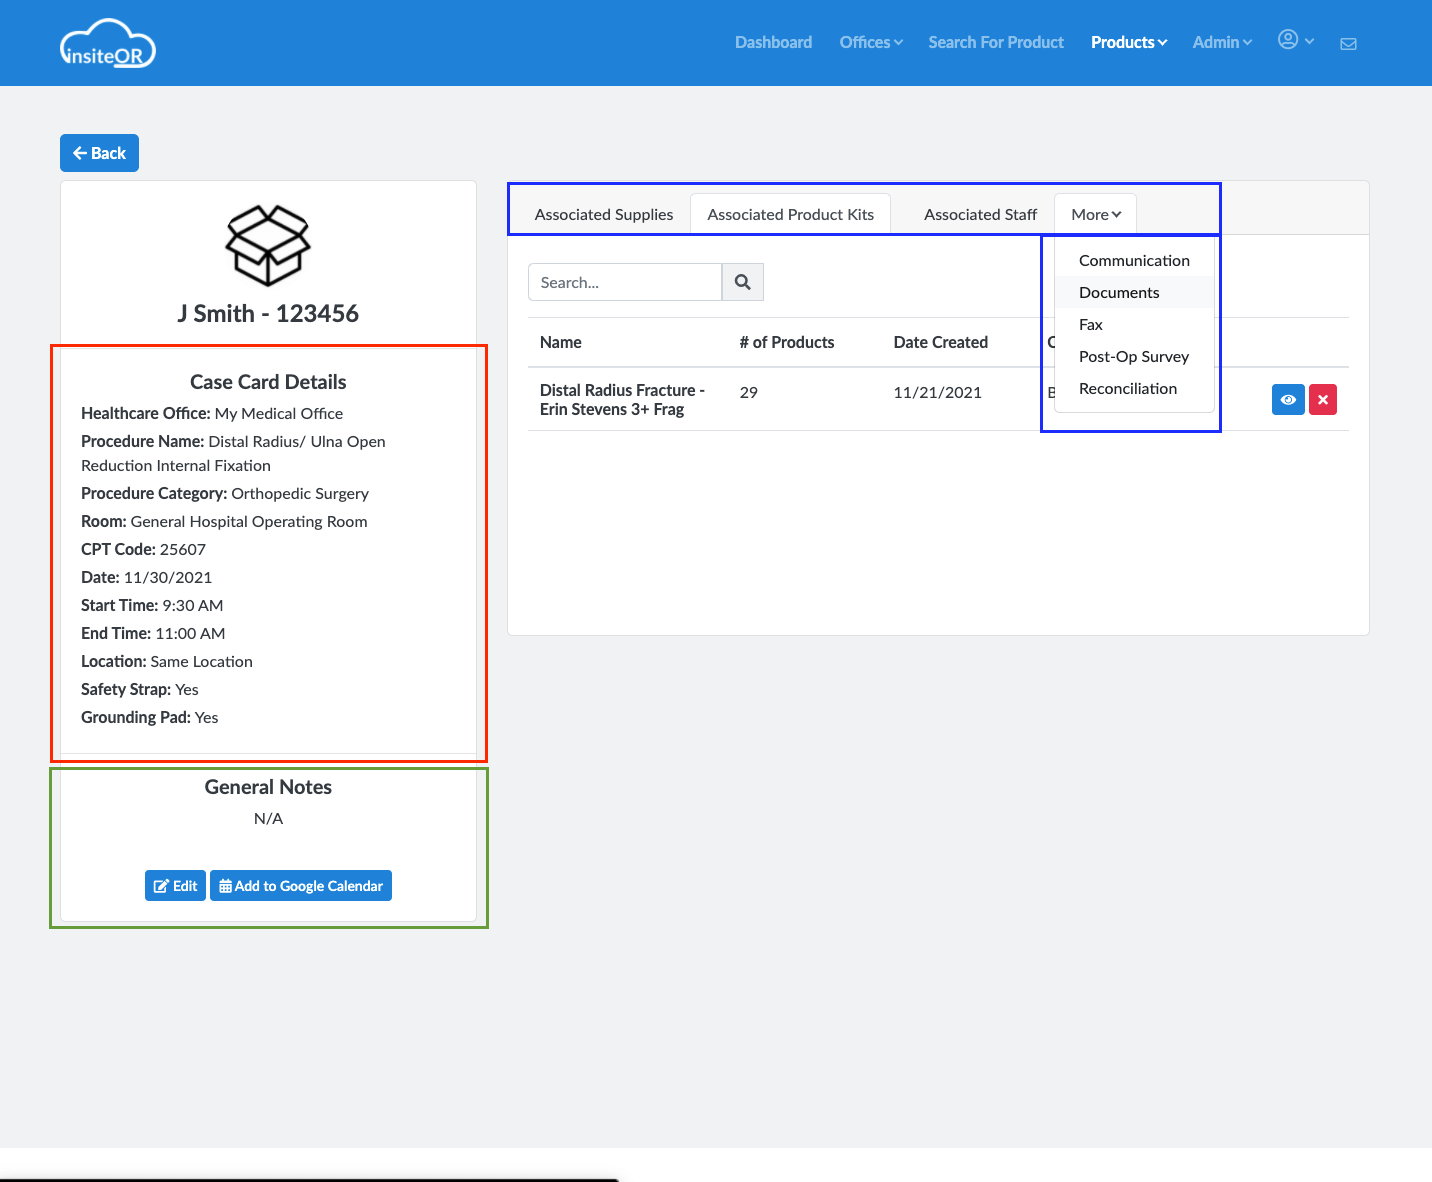
Case Card General Details
Healthcare Office
Shows the office that has scheduled the procedure. If you are the Health Office Admin, this is likely going to be your office. If you are another user, this will tell you the original requestor of the procedure.
Procedure Name
The name of the procedure comes from the templated preference card of the provider.
You can edit and adjust the name at any time and will notify users that these details have changed.
For example, if the physician adjusts their approach to the procedure and the name is updated, InsiteOR will know to notify those involved.
Procedure Category
This helps you categorize the procedure by the specialty and area of medicine the procedure is performed in.
Later on, this will show you Analytics by category based on the operational metrics that matter to you.
Room
This field represents the Operating Room at the facility the surgery is taking place in. This helps schedulers alert vendors, physicians, and others where a particular procedure is being performed without needing to list everything out in emails.
If this changes, it will also automatically notify the user about this change and what it was.
CPT Code
InsiteOR automatically selects the CPT, ICD-10, and other billing codes that are used in the claims process on the Case Card based on the procedure being scheduled.
You can enter in multiple CPT codes, and in the Case Reconciliation process, you can adjust these CPT codes to better reflect the outcomes of the procedure or what we performed.
Date
This field will show the current date of the procedure. You can enter a placeholder date at any time and edit this field after creating the Case Card.
If this date changes and notification is sent automatically to any of the associated staff users.
Start Time
This is the starting time of the procedure, you can adjust this time by clicking on the field and using the arrows or selecting in increments of 15 minutes.
End Time
At the end time of the procedure, you can adjust this time by clicking on the field and using the arrows or selecting in increments of 15 minutes.
Location
These are the location notes for the procedure. This can be helpful information to direct users, vendors, or temporary staff coverage to find where they need to go as well as more detailed information about the Room or the Facility the procedure is being performed in.
Miscellaneous
Over time, various miscellaneous items will be added to the Case Cards to accommodate all of our users. The list of those items is here and you will be given the option to hide them from your Case Card page if they are not needed.
Safety Strap
Grounding Pad
General Notes*
The General Notes section of Case Cards contains all of the instructions, notes, and reminders regarding your OR preferences. These details come from your notes stored in your Smart Cards, which are our version of your Physician Preference Cards.
The data will be organized into various categories under the General Notes section and will allow you to more easily navigate through the equipment, drug, dressing, and other note sections.
Associated Supplies
Click on the “Associated Supplies” tab to view all of the supplies used for this Case
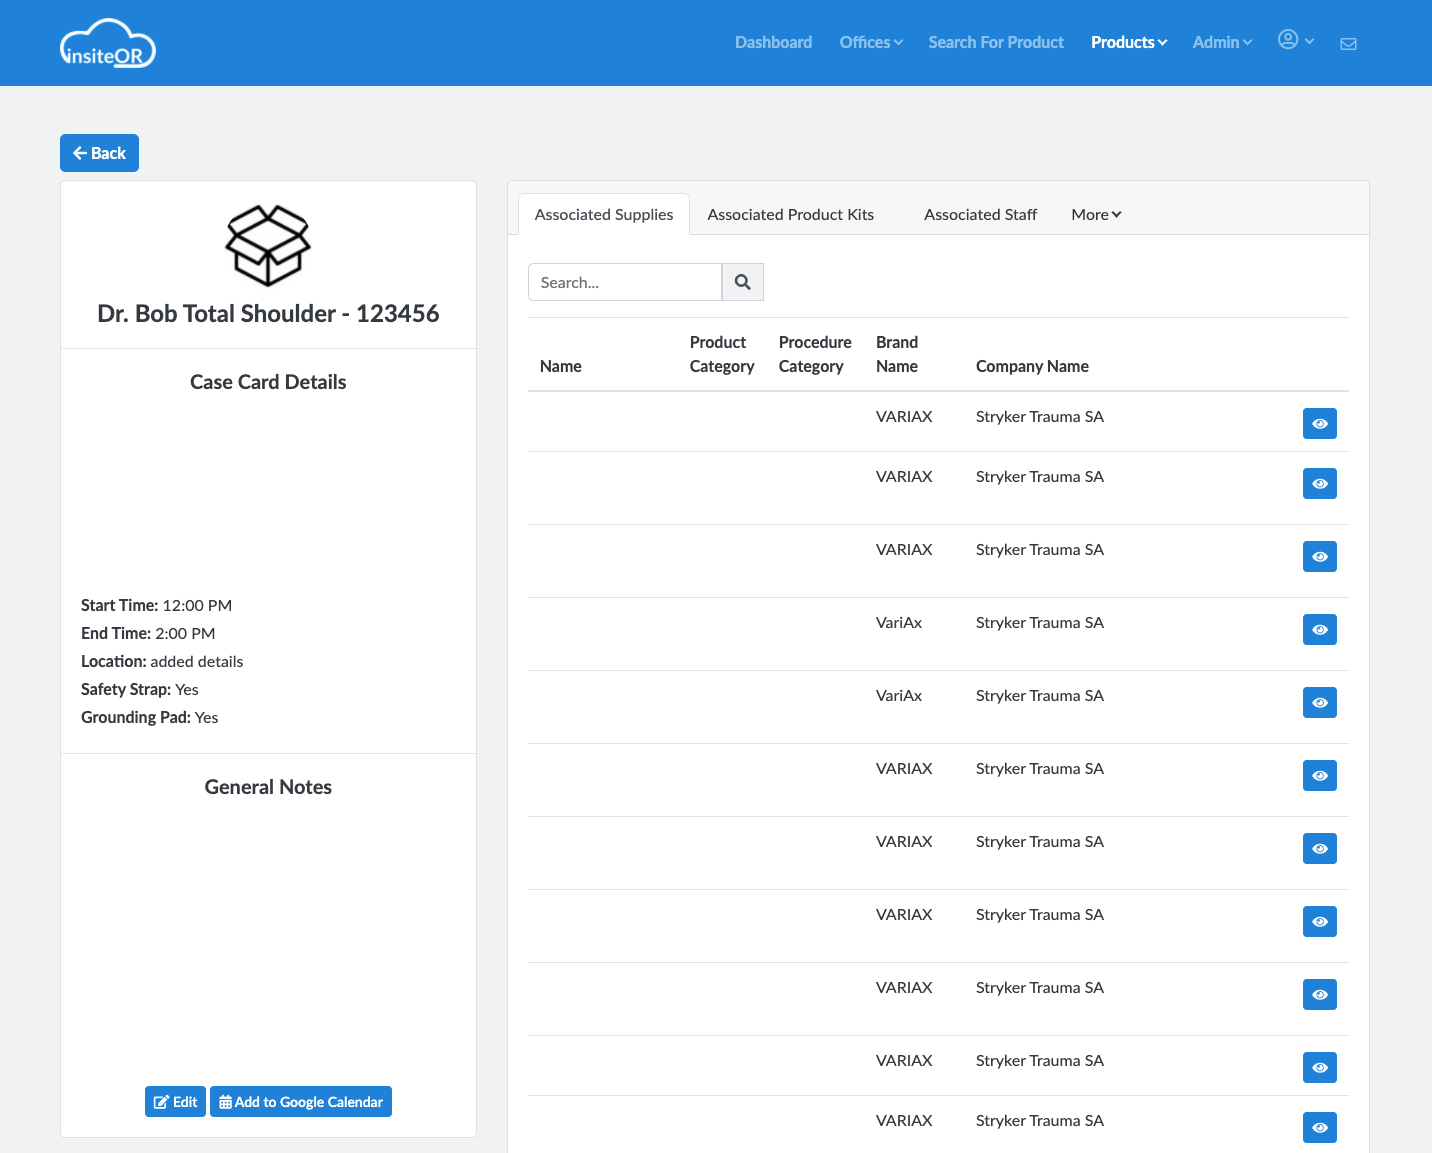
Every Case Card on InsiteOR can store hundreds of items listed line by line.
You can view more product information in more detail by clicking the “Eye” icon to the right of the company name.
Products that are associated with a Medical Representative will have them listed on the product and you can then reach out to them from there with further questions.
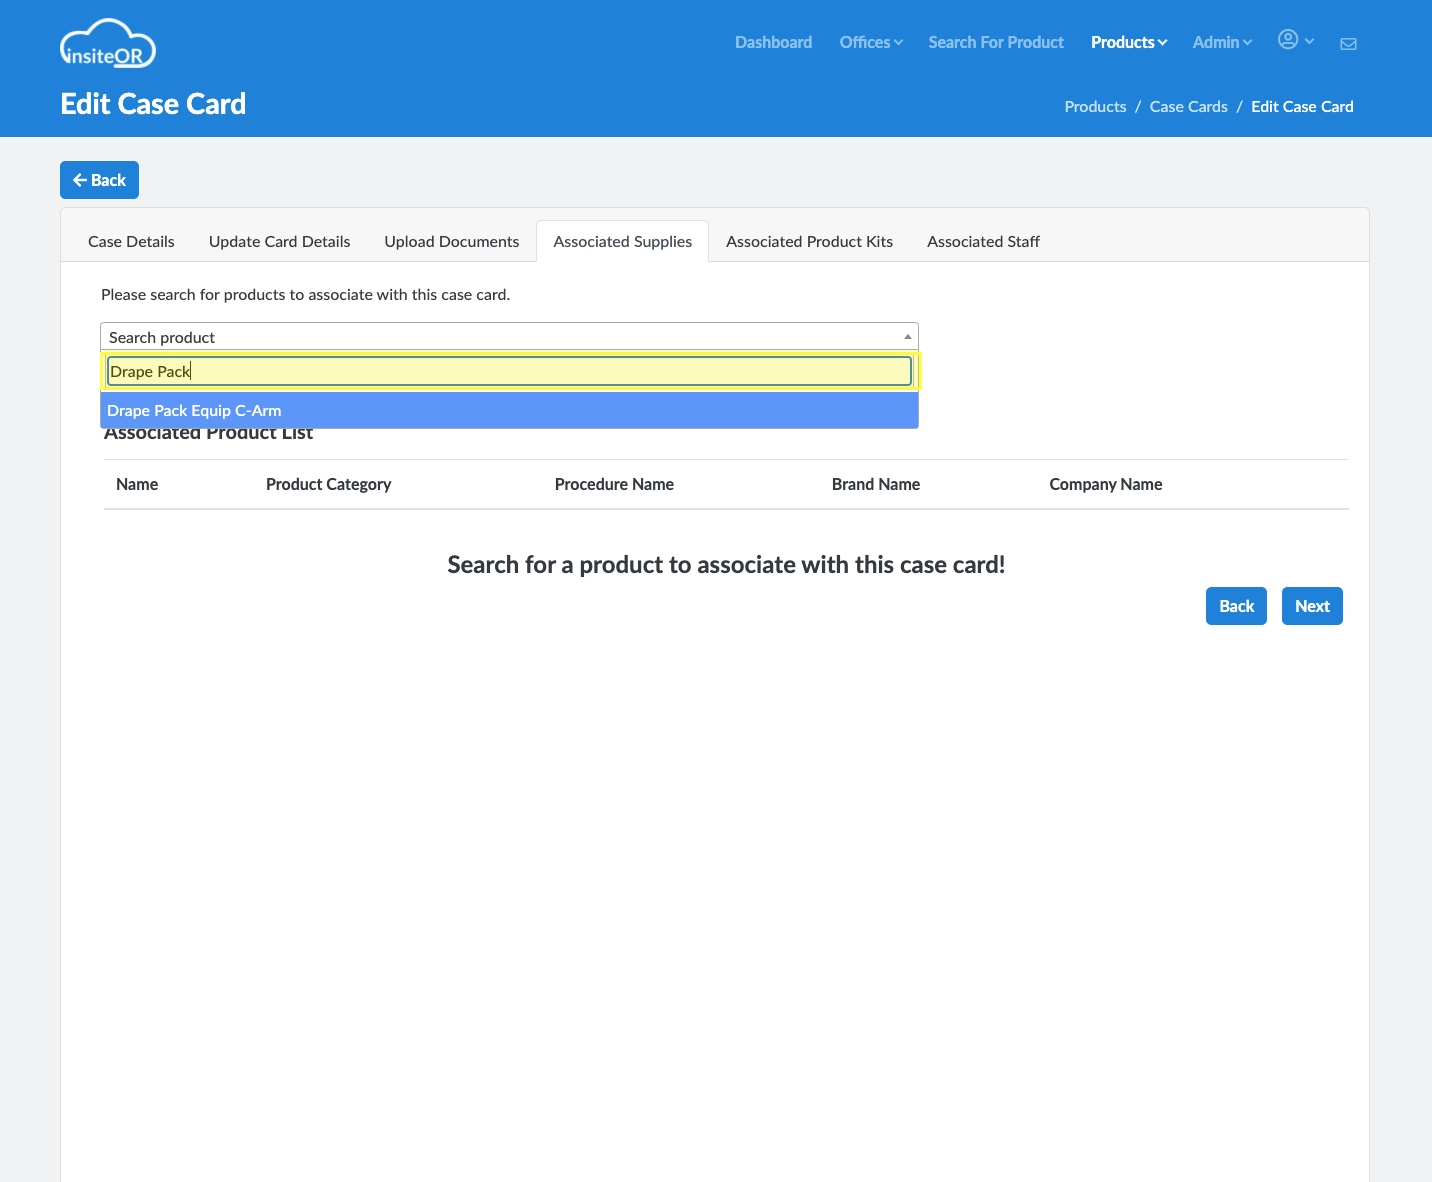
You can also search for a specific product by name, version number, and more. If the Case Card contains the product it will display it or anything that matches the name.
If not, you will see the “Find Products to Add” screen.
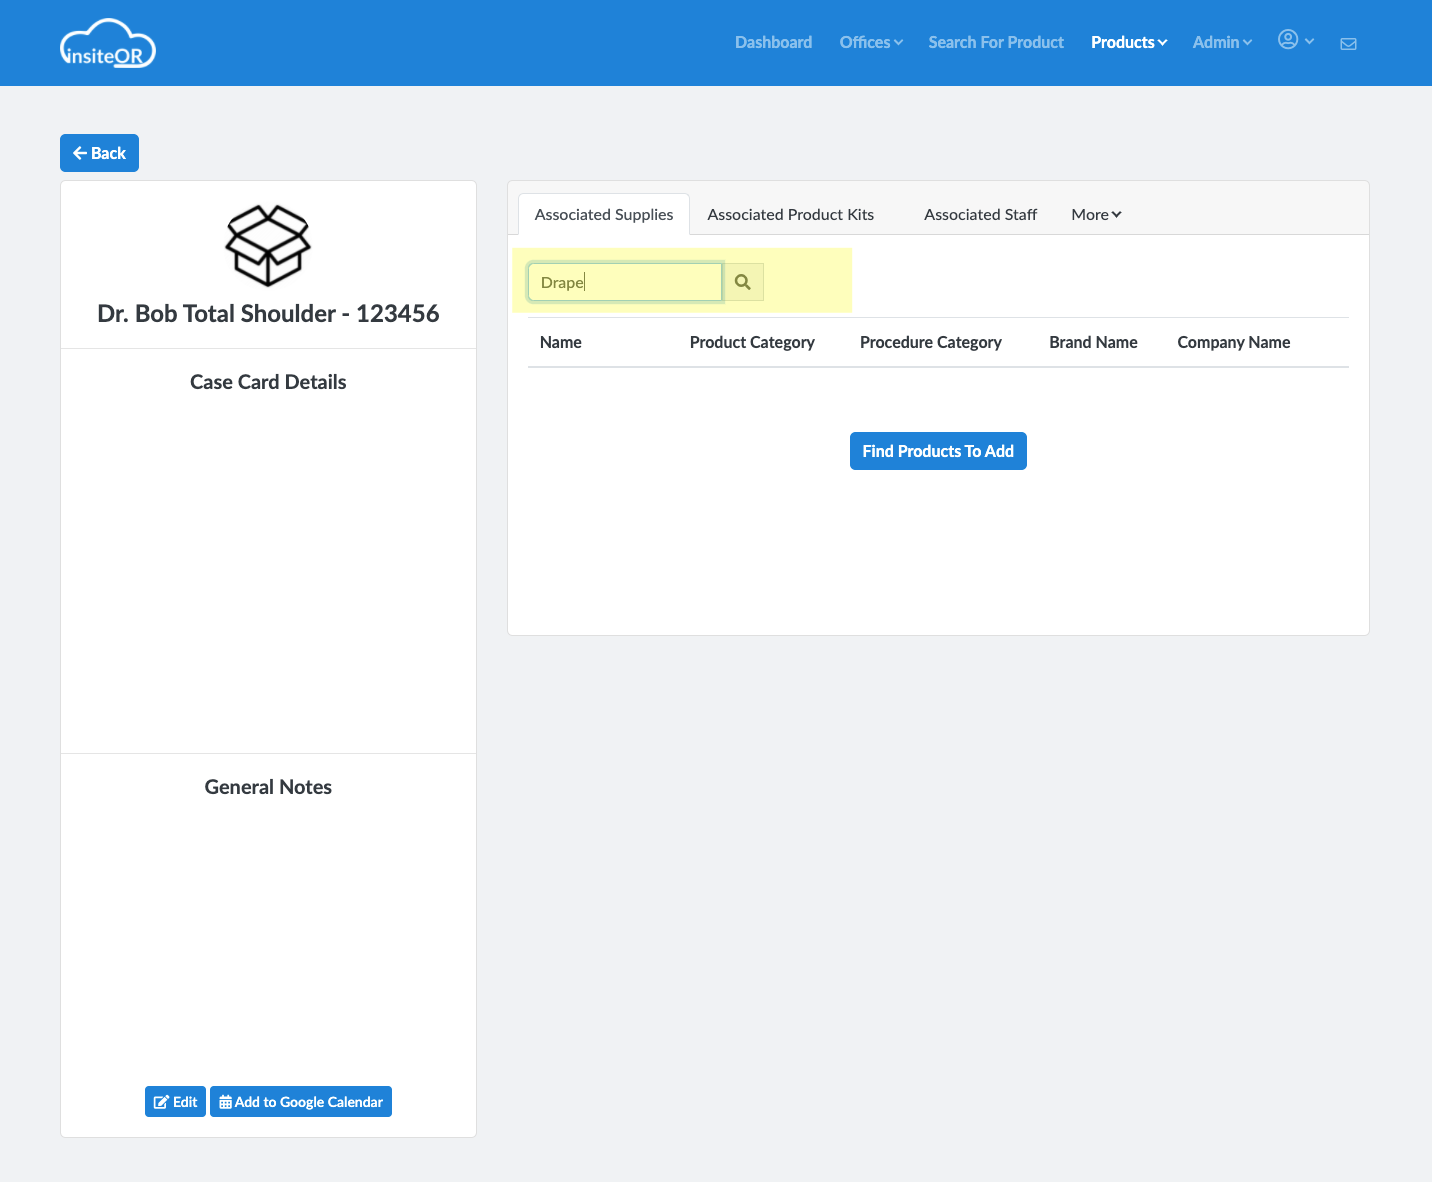

If the Case Card does not yet have any Supplies added to it, users can click the “Find Products to Add”
This will bring you straight to the Edit Case Card screen where you can click to search for any of the products you have in your InsiteOR inventory.
Make sure to click in the area marked by the yellow box before you begin typing.
Associated Product Kits
Click on the “Associated Product Kits” tab to view all of the Equipment Kits and Trays used for this Case
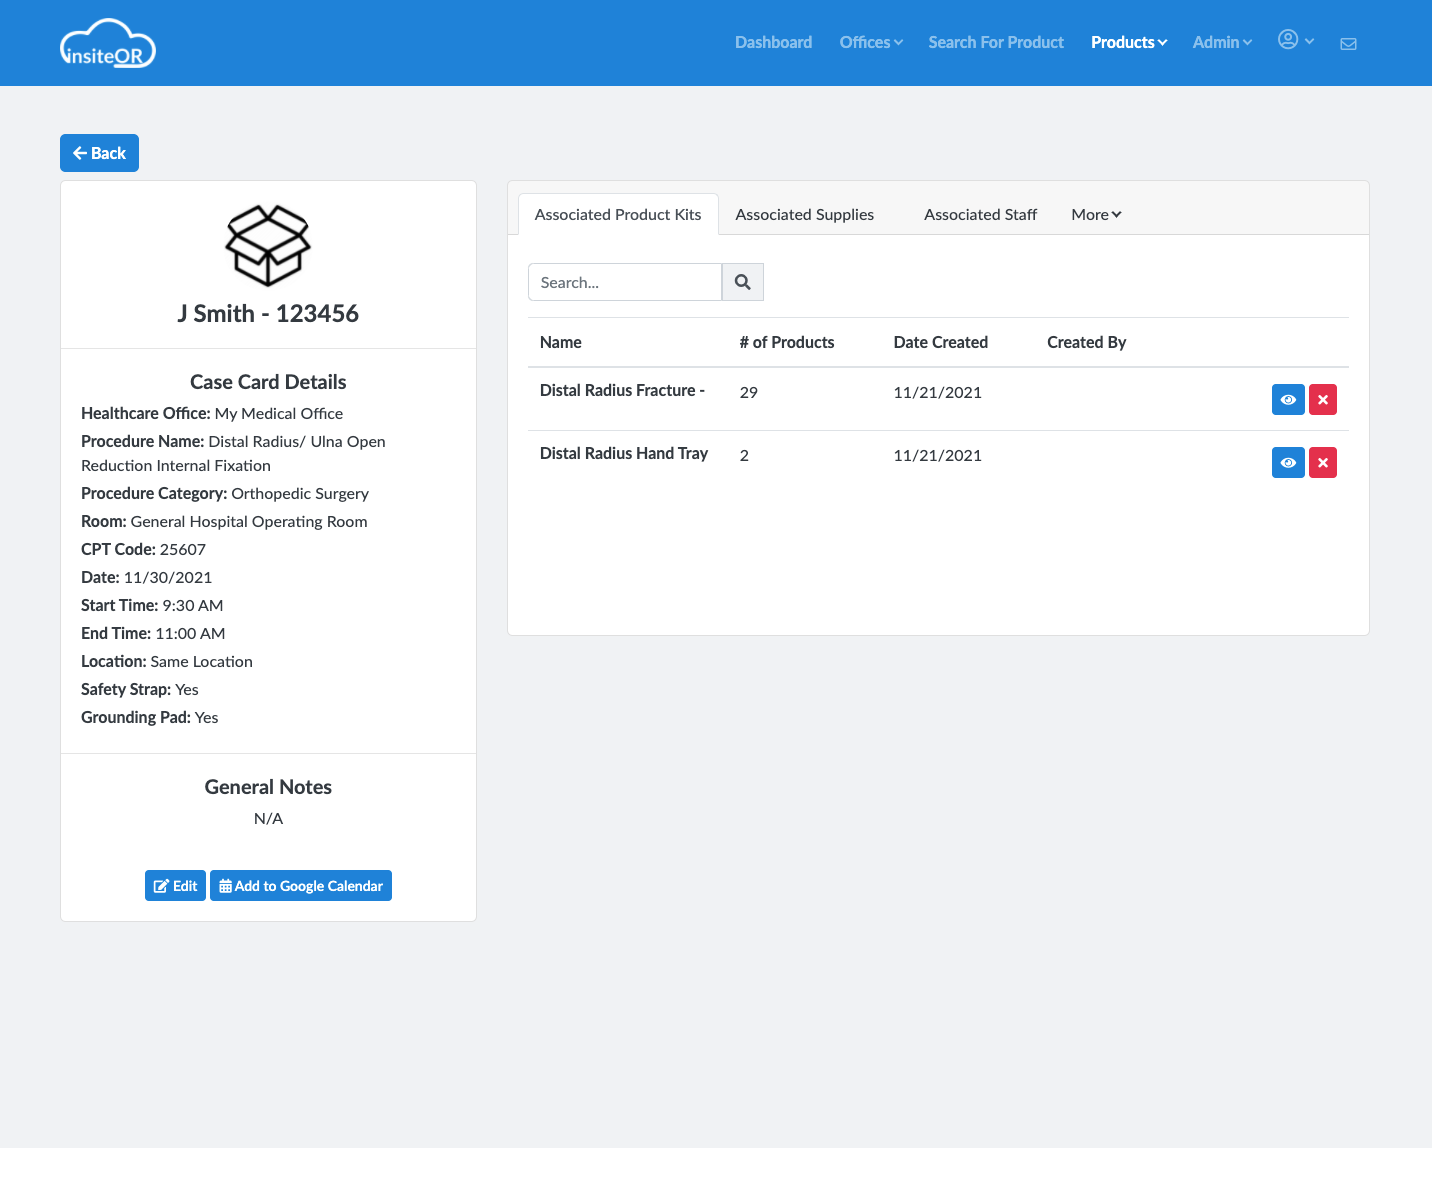
Case Cards on InsiteOR can store multiple trays and product kits to help represent and account for devices and equipment used in the procedure.
You can view each Product Kit in much more detail by clicking the “Eye” icon to the right of the company name.
Product Kits that are associated with a Medical Representative will have them listed on the product and you can then reach out to them from there with further questions.
To learn more about Product Kits, go here.
You can also search for a specific Product Kit by name. If the Case Card contains the product it will display it or anything that matches the name.
If not, you will see the “Find Product Kits to Add” screen.
If the Case Card does not yet have any Product Kits added to it, users can click the “Find Products to Add”
For Medical Reps, this will bring you straight to the Edit Case Card screen where you can click to search for any of the Kits you have in your InsiteOR inventory that the Physician or Scrub Techs will need.
Make sure to click in the area marked by the yellow box before you begin typing.
Associated Staff
Click on the “Associated Staff” tab to view the Surgical Care Team assigned for this case
Each staff member listed on the Case Card represents a different user from InsiteOR that’s been added to the procedure.
You can add anyone with an InsiteOR Profile to a Case Card which will enable them to stay in constant contact with you about the procedure.
You can search for a staff member or Medical Rep’s name using the search bar, and if you can not find them you can easily edit and add them to the Case.
Learn more about creating and editing Case Cards here.

Communication
InsiteOR provides you with a Communications tab that you can use to communicate with the Users associated with any Case Card in a group-styled setting.
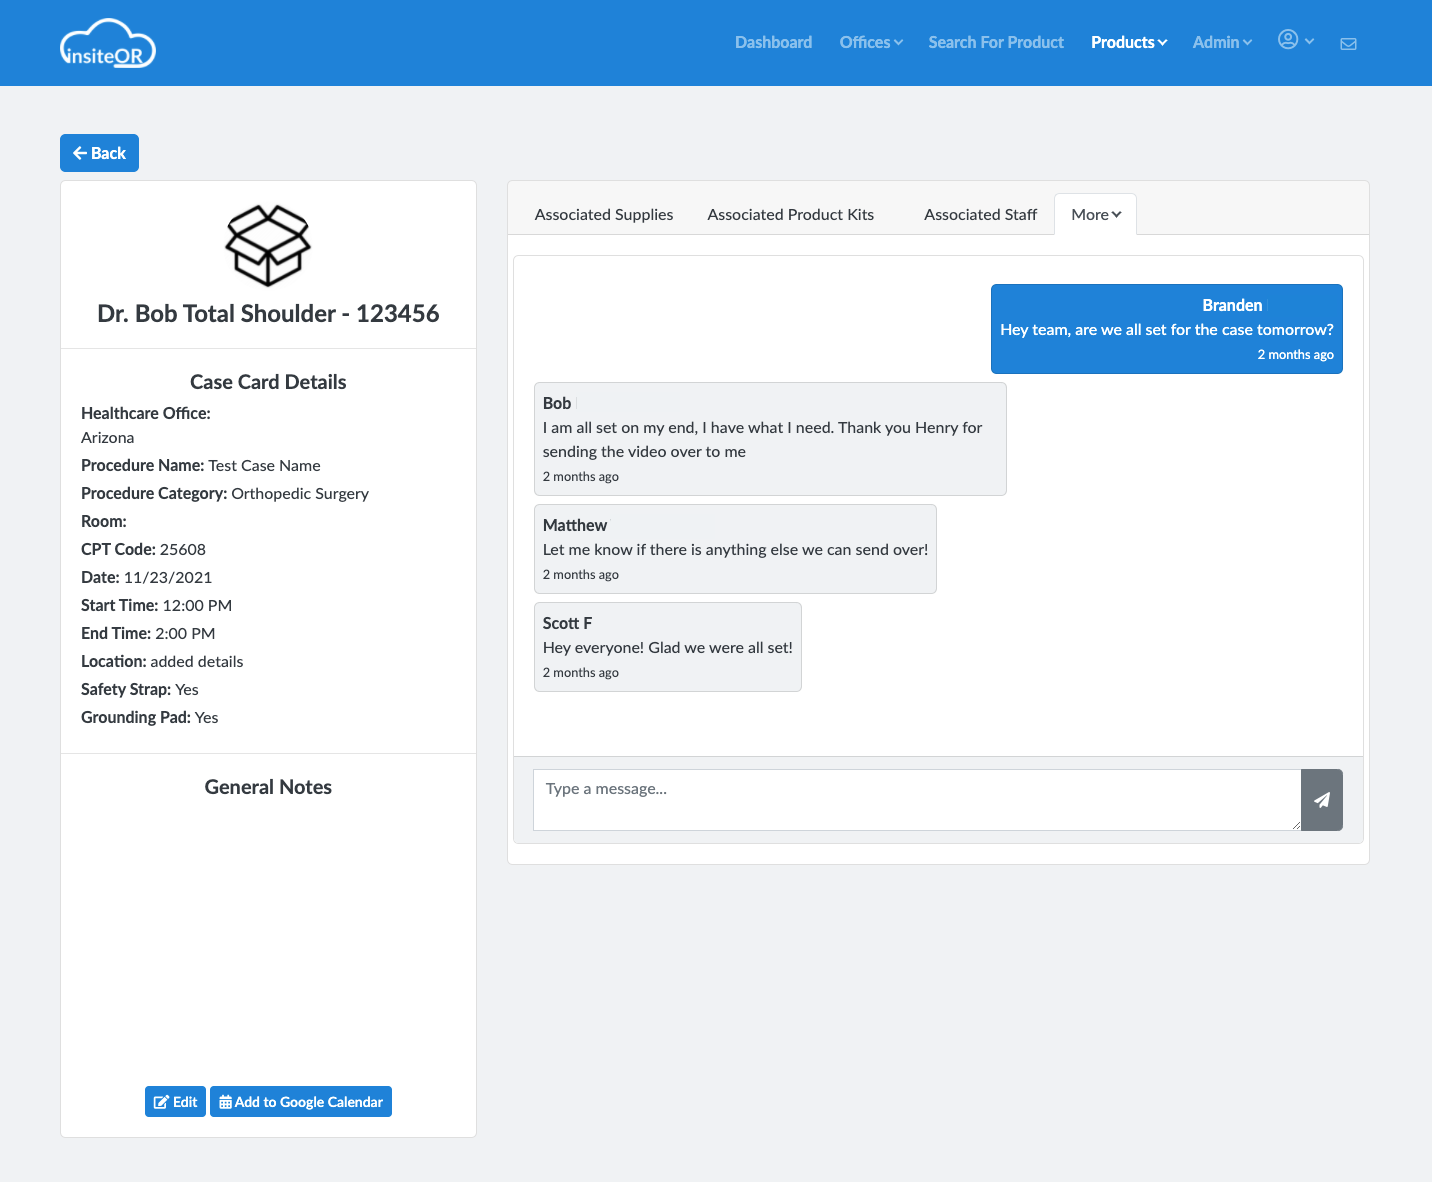
Click on the “Communications” tab to bring up the communications panel and message box.
The Communications tab shows messages as they were sent starting with the very first message.
To send a message, click the “Type a Message” box and begin typing the message you want to send. Once you have typed the message, click the “Paper Airplane” icon.
Once you click the icon, the message will post to the Case Card, and users will be notified of this new message immediately based on their Notification Preferences.
You can share links to different product kits, documents, and other links from InsiteOR and the communications chat box will automatically display the name of the item you share.
Documents
Click on the “Documents” tab to view all of the Documents that have been uploaded to and associated with the Case Card
You can upload “.xls, .xlsx, .csv, .pdf" file types to a Case Card
To upload a file, click on the “Browse Files” button to open your file manager and select the file you want to upload.
You can edit the names of the files you uploaded by going into the Case Card and entering the Upload Documents Tab under the “Edit Case Card” flow

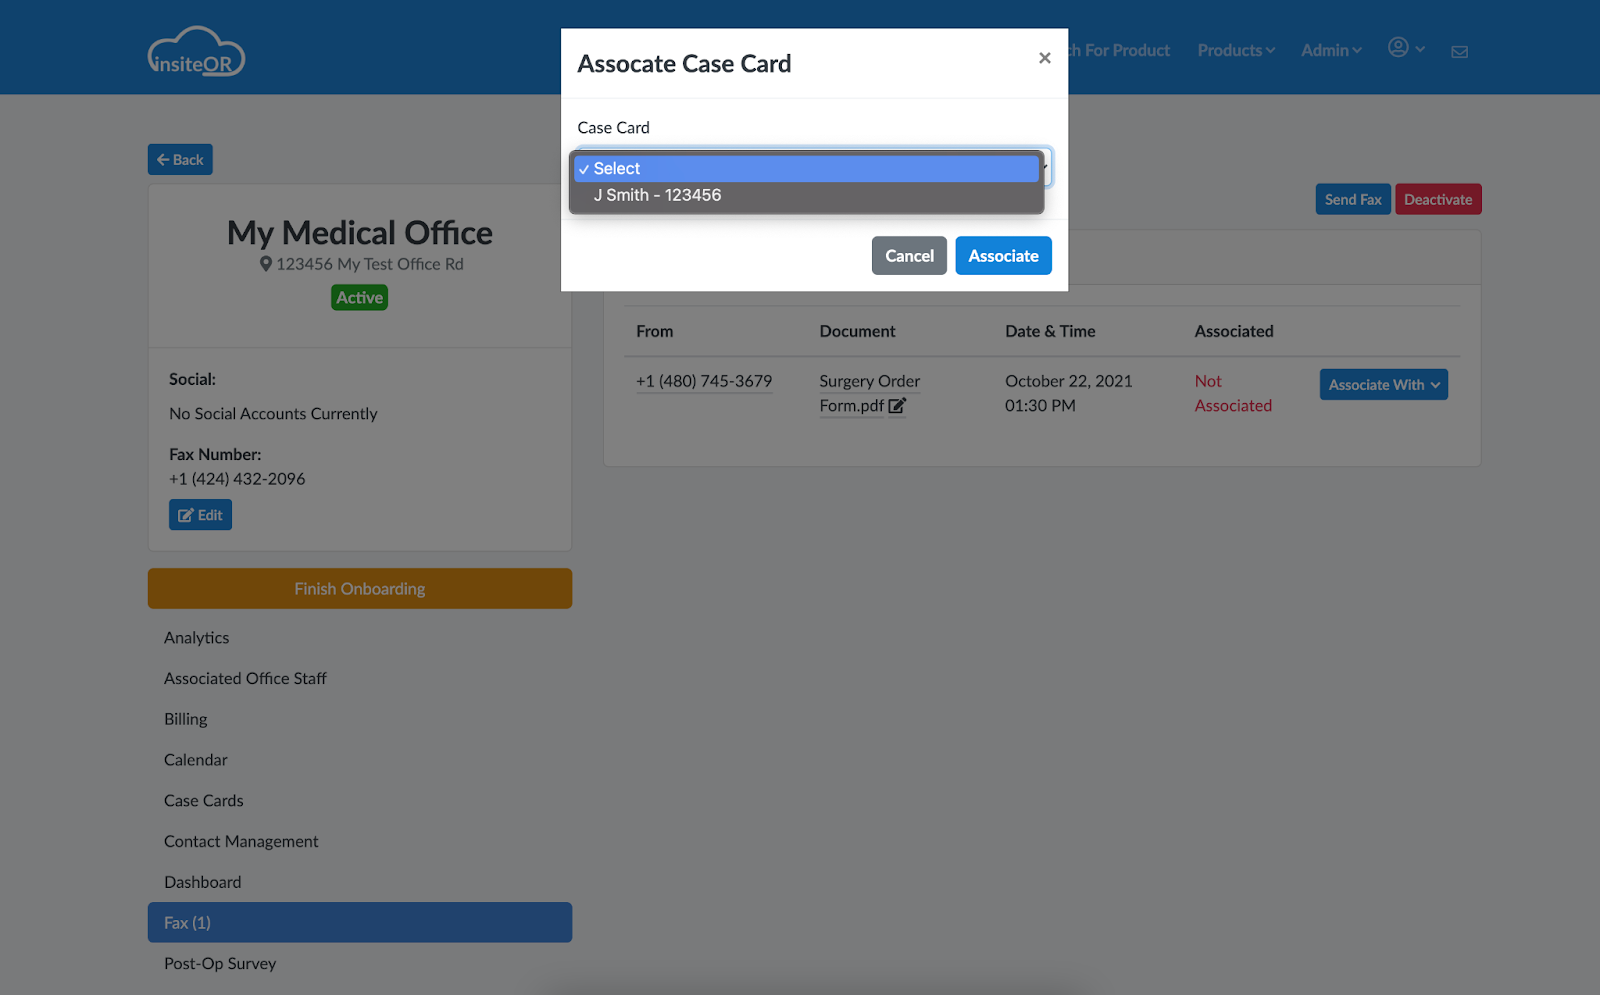
Fax
Similar to how you attach, associate, and upload files to a Case on InsiteOR, you can also attach Fax Messages with a specific procedure. This gives you a ton of flexibility in how you want to coordinate and work with your colleagues.
Click on the “Fax” tab to view all of the Fax Messages that have been associated with the Case Card. Every Fax Message will have a From Number, Document Link, and Date & Time of the message.
If you click on the Document Name i.e. “Some Document.pdf” you will open the document (or initiate a download)
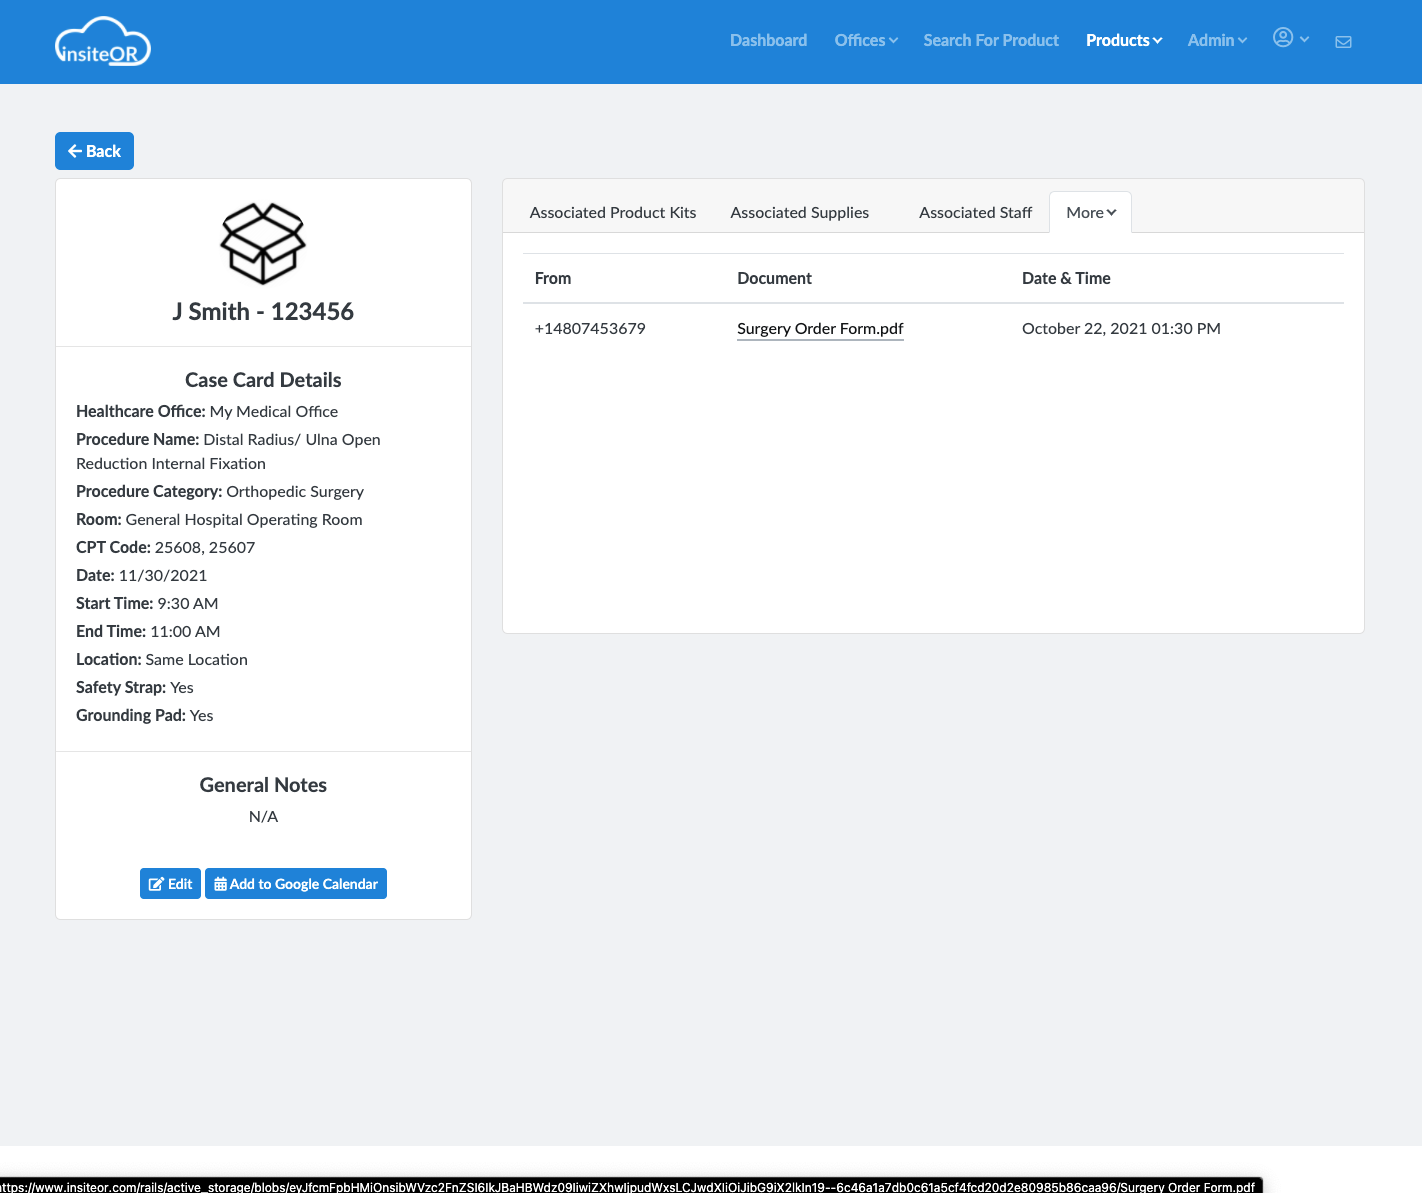
You can change the name of the Fax from the Fax Menu
Learn More about Fax Messages here
Post-Op Survey
Click on the “Post-Op Survey” tab to view all of the submitted surveys for this Case Card
Post-Op surveys can help capture a ton of information and this page allows you to view that information
Every user who is associated with the Case Card is invited to submit a response to the Post-Operative survey but it’s not a requirement.
You can also create your surveys and use certain questions for some procedures and not for others.
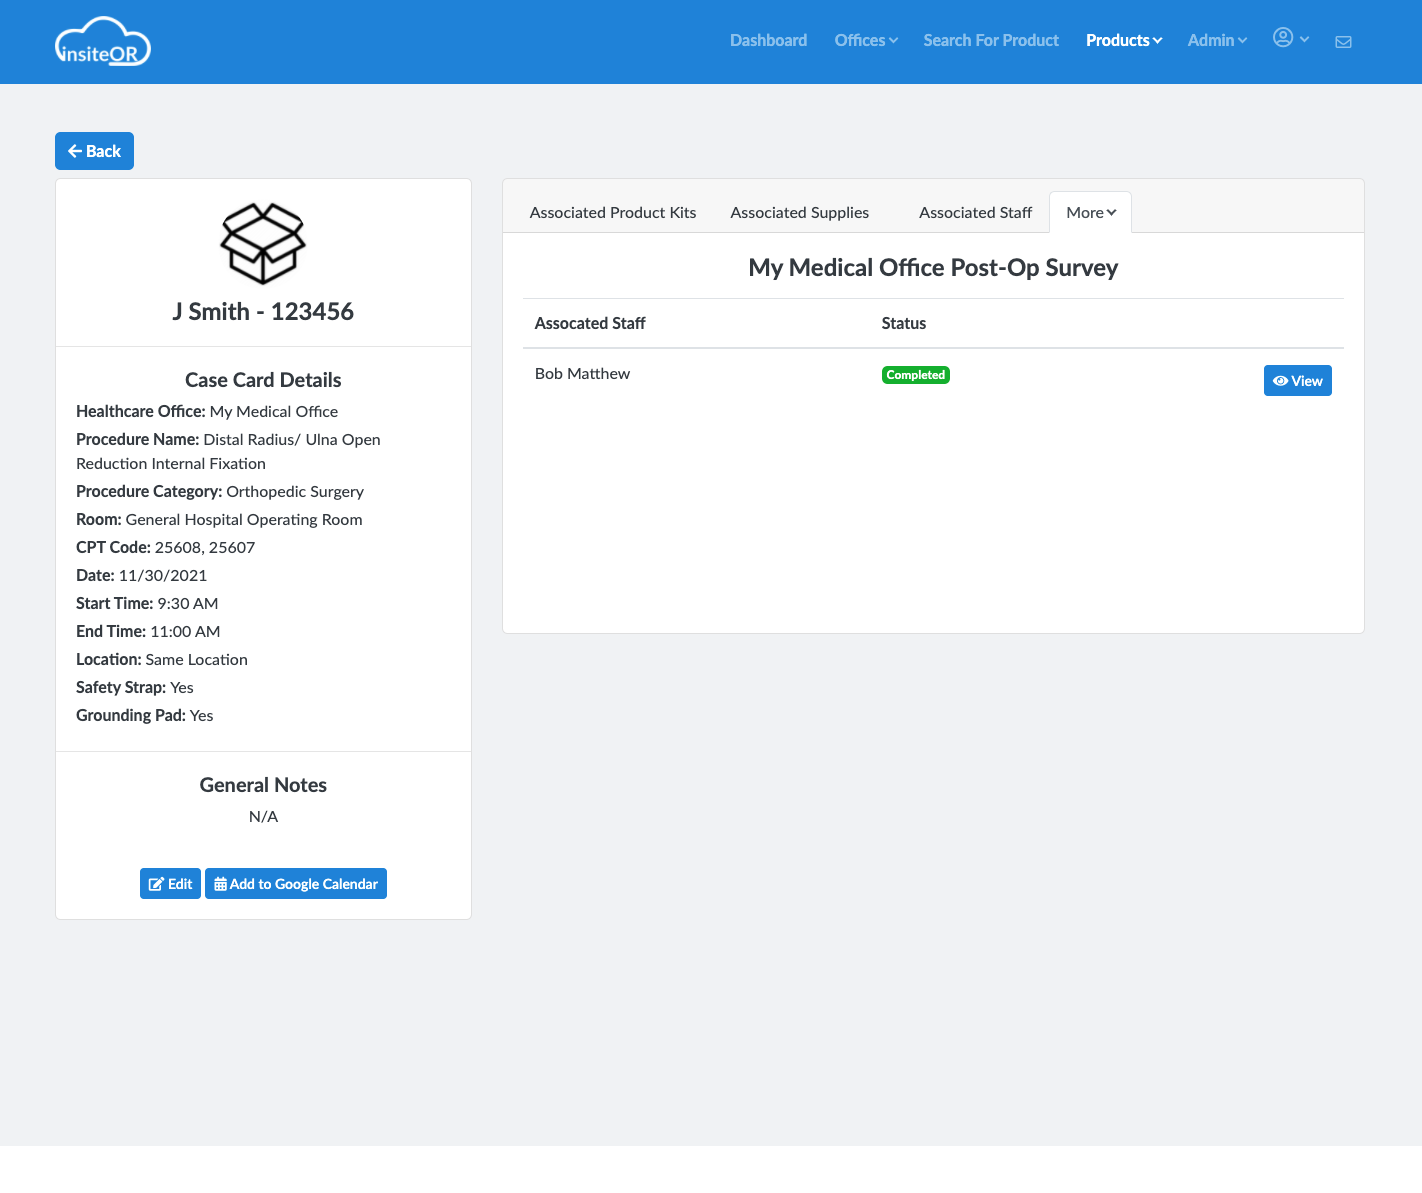
To view a survey’s response, click the “View” icon to the right of the survey response name.
This will generate a pop-up on-screen with the different responses that the user provided for that case.
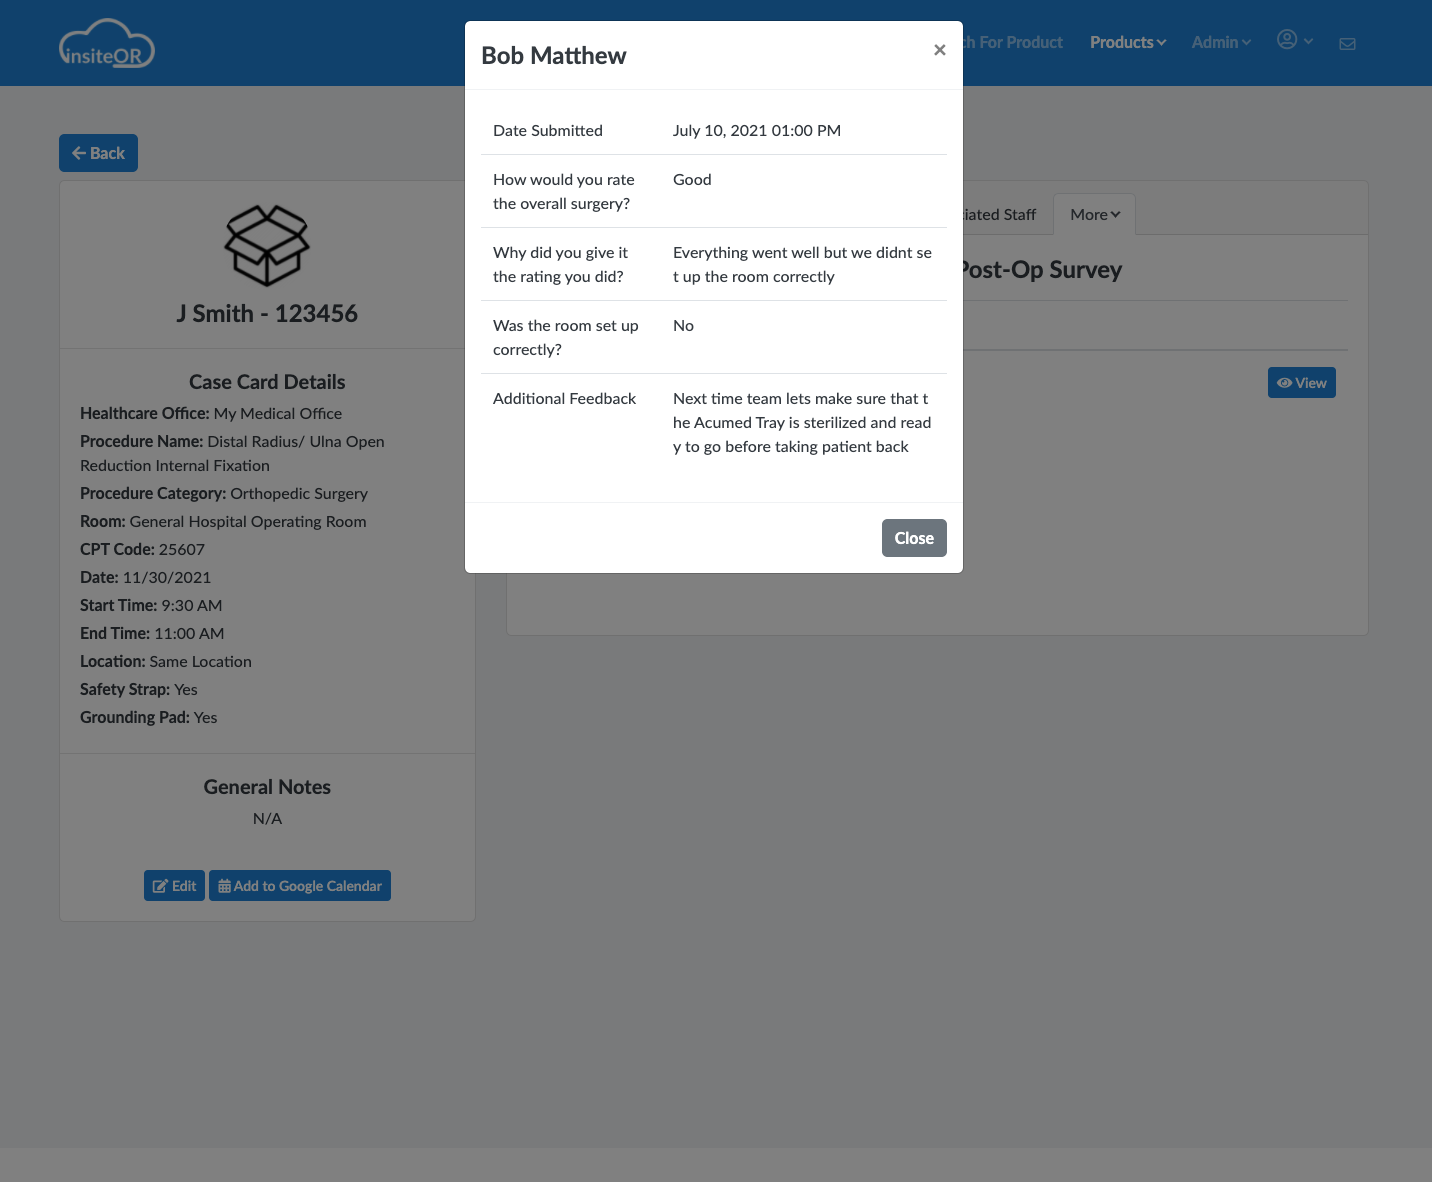
Illustrative purposes only, we have no association to or information about Acumed and their performance. The statement above is completely for illustrative purposes only.
Reconciliation
InsiteOR provides users with the ability to record outcomes and document the details of those outcomes to better inform and understand how to improve and what the cause and effect of those outcomes were. For example, during the case, a procedure may change from the planned approach and thus requires a new CPT or ICD-10 code. InsiteOR gives you the flexibility to make these changes without sacrificing time, accuracy, or compliance.
Click on the “Reconciliation” tab to review all the reconciled status for the Case Card
This will bring you to the main Reconciliation page view where you can see the original start time, end time, and coded procedure name and codes.
Below that, the Staff Roster and the Implant Entries (if applicable) are listed.

To begin the reconciliation process, click on the “Update Reconciliation Data” button on the top right of the screen.
This will prompt you to update the Start Time and End Time, if applicable. Additionally, you will update the correct CPT® codes and Procedure names based on the outcomes of the surgery.
Next, you will be able to mark the attendance of the care team for the procedure.

To update the User’s “Present” status, simply click the toggle from “Present” or “Not Present”
Additionally, there is a place for your vendor to record the Implants used, their serial numbers, and other information. This helps correlate the serial number of the implant used with the patient it was placed in, allowing you to make follow-up appointments much easier if a recall is ever needed. (hopefully not…)